
How to Clean Earbuds Safely and Effectively (Complete 2026 Guide)
Amazon Affiliate Disclosure
Some links on this page may be affiliate links. If you purchase through them, earsbud.com may earn a commission at no additional cost to you.
Earbuds collect far more than visible dust. Every time you place them in your ears, the ear tips, speaker mesh, charging contacts, seams, and case pick up a mix of earwax, skin oils, lint, sweat, moisture, bacteria, and fine debris. Over time, that buildup can muffle sound, weaken bass response, reduce microphone clarity, interfere with charging, and make even premium earbuds feel less clean, less comfortable, and less reliable. That is why learning how to clean earbuds properly is not just a hygiene habit—it is part of basic earbud maintenance.
The challenge is that cleaning earbuds requires care. Earbuds are small electronic devices with delicate speaker grilles, microphones, sensors, batteries, magnets, and charging pins. Using too much liquid, pushing wax deeper into the mesh, scraping with sharp tools, or soaking the wrong parts can cause more damage than the dirt itself. A good cleaning routine should remove buildup without forcing moisture into the earbuds, damaging acoustic filters, or weakening silicone ear tips.
This matters even more if you use earbuds daily for commuting, workouts, calls, gaming, study sessions, or long listening periods. Budget wired earbuds, cheap true wireless earbuds, premium ANC models, and the best noise cancelling earbuds all need regular cleaning because earwax and oil can affect the seal between the earbud and the ear canal. A poor seal can make noise cancellation weaker, make music sound thinner, and force you to raise the volume higher than necessary.
A proper earbud cleaning routine also helps protect the charging case. Many users clean the earbuds themselves but forget the case, where lint, dust, and wax residue can collect around the charging pins and lid edges. If the contacts become dirty, one earbud may charge slowly, disconnect randomly, or stop charging altogether. In many cases, what feels like a battery or Bluetooth problem is actually a cleaning problem.
This guide explains how to clean earbuds safely using practical tools, careful methods, and material-specific precautions. You will learn what to clean, what to avoid, how often to clean different earbud parts, and how to handle silicone tips, speaker mesh, microphone openings, charging contacts, and storage cases without damaging the device. For more buying, care, and performance advice, explore our complete Earbuds Guide.
The goal is simple: cleaner earbuds, clearer sound, better hygiene, stronger long-term performance, and fewer avoidable problems caused by wax, moisture, or careless cleaning.
👉 Explore more: Homepage
Quick Navigation
| If You Want To… | Jump To | What You’ll Learn |
|---|---|---|
| Understand why cleaning earbuds matters | Benefits | How clean earbuds improve sound quality, hygiene, comfort, charging reliability, and long-term performance. |
| Follow the safest cleaning process | Step-by-Step Cleaning Guide | Daily dry cleaning, weekly deep cleaning, silicone tip washing, and charging case maintenance. |
| Clean the right way for your earbud style | Cleaning by Earbud Type | How to clean wired earbuds, true wireless earbuds, and noise cancelling earbuds without damaging connectors, contacts, microphones, or ANC vents. |
| Just want to quickly buy the safest cleaning kit | Best Cleaning Kit 🪣🧼 | Which brushes, cloths, swabs, cleaning putty, and earbud cleaning kits are useful—and the best cleaning kit in the market. |
| Compare cleaning methods quickly | Comparison Chart | Dry brushing, alcohol swabs, UV sanitizers, soap-and-water ear tip cleaning, and full cleaning kits compared by risk, cost, and effectiveness. |
| Know what cleaning should cost | Costs | Budget-friendly cleaning options, reusable tools, replacement ear tips, and when a kit is worth buying. |
| Avoid common cleaning mistakes | Risks | Why too much liquid, sharp tools, aggressive scraping, and wet charging cases can permanently damage earbuds. |
| Explore newer cleaning technology | Latest Trends & Tech | Self-cleaning earbuds, UV charging cases, hydrophobic mesh, antibacterial coatings, and smarter cleaning kits. |
| Get direct answers to common questions | FAQs | How often to clean earbuds, whether water is safe, why earbuds sound muffled, and when to replace earbud rubber tips. |
| Find what people as asking | People Also Ask | Focused answers about cleaning mesh, improving ANC, using earbuds cleaning kits, and avoiding at-home cleaning mistakes. |
| Read the final expert takeaway | Editorial Insights | A balanced summary on why cleaning earbuds is maintenance, not cosmetic care—and why precision matters. |
What This Guide Covers
This guide is built to answer every practical version of the question “how do you clean earbuds?”—not just at a surface level, but in a way that helps protect sound quality, hygiene, comfort, and long-term performance. Earbuds are small, delicate devices, and the wrong cleaning method can push wax deeper into the mesh, damage microphones, loosen filters, or introduce moisture into sensitive electronics. That is why this page focuses on safe, step-by-step cleaning methods rather than quick hacks that may cause permanent damage.
You will learn how to clean wireless earbuds safely, including how to handle the speaker mesh, microphone openings, charging contacts, earbud body, charging case, and removable silicone ear tips. Silicone tips need special attention because they sit directly inside the ear and collect the most earwax, oil, sweat, and bacteria. Cleaning them properly can improve comfort, restore a better seal, and help earbuds sound fuller—especially if bass or noise isolation has started to feel weaker.
This page also explains when an earphone cleaning kit is useful and when simple household tools are enough. A good cleaning kit may include a soft brush, microfiber cloth, cleaning putty, air blower, cotton swabs, and precision tools for case grooves and mesh edges. However, not every tool is safe for every earbud. Some brushes are too stiff, some liquids are too harsh, and sharp metal tools can damage acoustic mesh or protective filters. The goal is to help you clean effectively without turning routine maintenance into accidental repair work.
The guide also covers the difference between cleaning and replacing earbuds or ear tips. Sometimes earbuds only need a careful mesh cleaning or a fresh pair of silicone tips. Other times, weak battery life or charging failures may point to a replacement issue rather than a cleaning issue. Knowing the difference can save money and prevent unnecessary upgrades. If declining runtime is your main concern, explore our battery life tips guide to identify common causes of battery drain and ways to extend daily listening time.
Because modern earbuds are used for more than casual music—calls, gaming, commuting, workouts, ANC, transparency mode, and immersive listening—cleaning can also affect advanced features. For example, blocked vents or dirty microphones may reduce call clarity, noise cancellation performance, and environmental sound processing. If you use earbuds for immersive listening formats such as Spatial Audio, keeping the ear tips, mesh, and microphones clean can help preserve a more accurate listening experience.
This guide will cover:
| Cleaning Topic | What You’ll Learn | Why It Matters |
|---|---|---|
| How to clean wireless earbuds safely | Step-by-step cleaning methods for earbuds, cases, mesh, and contacts | Prevents damage while restoring hygiene and performance |
| How to clean earbud mesh without damage | Safe ways to remove wax and debris from speaker grilles | Helps recover muffled sound and weak volume |
| How to clean silicone ear tips | How to remove, wash, dry, and reinstall ear tips properly | Improves fit, comfort, seal, and cleanliness |
| Best earphone cleaning kit tools | Which tools are useful and which ones to avoid | Reduces the risk of scratches, moisture damage, or pushed-in wax |
| Cleaning vs replacing earbuds | How to tell when maintenance is enough and when replacement makes sense | Helps avoid wasting money on unnecessary upgrades |
| DIY vs professional cleaning | When home cleaning works and when expert help is safer | Useful for premium earbuds, blocked mesh, or charging failures |
By the end, you should know exactly how do you clean earbuds safely, what tools to use, how often to clean them, and how to avoid the most common mistakes that damage earbuds during cleaning.
Who Needs This Guide
This guide is for anyone who uses earbuds often enough for wax, sweat, dust, lint, and moisture to become a real problem. Many people only think about cleaning earphones when the sound becomes muffled, one side sounds quieter, or the earbuds start to look visibly dirty. But regular cleaning should begin long before performance drops. Earbuds sit close to the skin, ear canal, hair, pockets, bags, gym clothes, desks, and charging cases, so buildup is almost unavoidable.
If you use earbuds daily for music, phone calls, gaming, podcasts, commuting, workouts, studying, video meetings, or travel, this guide will help you understand how to wash earphones safely, when washing is appropriate, and which parts should never be exposed to too much moisture. The key is knowing the difference between washable accessories, such as removable silicone earbud covers, and sensitive electronic parts, such as speaker mesh, microphone openings, charging contacts, and internal drivers. For situations where performance issues go beyond cleaning, see how to fix earbuds not charging, which explains deeper charging and contact-related failures that simple washing cannot solve.
This guide is especially useful for:
| User Type | Common Problem | Cleaning Priority |
|---|---|---|
| Daily earbud users | Wax, oil, lint, and case debris | Routine cleaning for sound and hygiene |
| Gym users | Sweat, moisture, odor, and sticky ear tips | Cleaning silicone earbud covers and drying properly |
| Professionals | Muffled calls or unclear microphone pickup | Cleaning microphones, mesh, and charging contacts |
| Gamers | Low volume, blocked sound, or discomfort during long sessions | Removing wax buildup and keeping tips comfortable |
| Commuters and travelers | Dust, pocket lint, and dirty charging cases | Cleaning the case, seams, and earbud exterior |
| Budget earbud users | Faster wear from poor maintenance | Extending lifespan before replacing |
| Premium ANC users | Weak seal, reduced ANC, or poor transparency mode | Cleaning tips, vents, and acoustic openings |
Daily users need this guide because earbuds slowly collect residue even when they look clean. Skin oils can make the outer shell slippery, earwax can block speaker grilles, and dust can gather around the case magnets or charging pins. When that happens, earbuds may lose volume, sound unbalanced, or charge inconsistently. A few careful minutes of maintenance can prevent many of these problems.
Gym users need a stricter routine because sweat and moisture create a different kind of buildup. Sweat can dry around the ear tips, leave residue on the earbud body, and make silicone earbud covers feel sticky or uncomfortable. Removable silicone covers can usually be washed separately, but the earbuds themselves should be cleaned carefully with minimal moisture. This section matters because many users search how to wash earphones without realizing that only certain parts should be washed directly.
Professionals who rely on earbuds for calls, online meetings, client conversations, voice notes, or remote work also need regular cleaning. Microphone openings are tiny, and even small debris can affect voice pickup. If people say your voice sounds distant, muffled, or inconsistent, cleaning may help before you assume the earbuds are faulty. Clear audio depends on clean microphones, clean mesh, and a strong fit.
Users experiencing low volume or muffled sound should pay close attention. In many cases, weak sound is not caused by a damaged driver. It is caused by wax or debris sitting over the speaker mesh. Learning safe cleaning earphones methods can restore clarity without pushing dirt deeper into the grille. The wrong method, however, can make the blockage worse, so this guide focuses on gentle cleaning rather than aggressive scraping.
Anyone concerned about ear hygiene also needs this guide. Earbuds are personal devices, but they still come into contact with bacteria, sweat, and skin residue. Sharing earbuds, using them after workouts, storing them loose in bags, or wearing them for long sessions can increase hygiene concerns. Cleaning the earbuds, case, and silicone tips helps keep them fresher and more comfortable.
This guide is also helpful if you are deciding whether to clean, replace tips, or buy a new pair. Sometimes earbuds only need a proper cleaning routine; other times, worn tips, weak batteries, damaged mesh, or failing microphones may mean it is time to upgrade. If your current pair is too damaged or no longer worth maintaining, compare the latest true wireless earbuds to see how newer models improve battery life, ANC, call quality, comfort and connectivity.
The goal is simple: help every type of earbud user clean smarter, protect sound quality, reduce hygiene concerns, and extend the useful life of their earbuds without damaging delicate components.
Why Cleaning Earbuds Matters
Cleaning earbuds is not just about making them look better. It directly affects how they sound, how comfortable they feel, how hygienic they are, and how long they last. Because earbuds sit close to the ear canal, they are exposed to earwax, skin oils, sweat, moisture, dust, lint, and bacteria every time they are used. That buildup may seem minor at first, but over time it can block speaker mesh, weaken the ear tip seal, reduce microphone clarity, interfere with charging, and make the earbuds less pleasant to wear.
For most users, the first sign is not visible dirt. It is usually a change in performance: one earbud sounds quieter, bass feels weaker, vocals become dull, calls sound muffled, or the earbuds stop charging consistently. In many cases, the problem is not a failing driver or weak battery. It is buildup sitting in the wrong place. That is why regular earbud cleaning should be treated as basic maintenance, especially if you use them daily for music, calls, workouts, travel, gaming, or work.
| Cleaning Benefit | What It Improves | Why It Matters |
|---|---|---|
| Audio performance | Volume, clarity, bass, treble, balance | Prevents wax and debris from blocking sound |
| Hygiene | Freshness, comfort, odor control | Reduces buildup from sweat, oil, and bacteria |
| Longevity | Charging, mesh protection, case cleanliness | Helps prevent avoidable wear and malfunction |
Performance Benefits
Earbuds depend on tiny acoustic openings. The speaker mesh, vents, microphones, and ear tips all influence how sound reaches your ears. When earwax or dust collects around those areas, audio can become dull, uneven, or distorted. This is especially noticeable with in-ear models because the sound passes through a small grille before entering the ear canal.
Cleaning earbuds can help restore clearer audio output by removing the layer of wax, oil, and debris that blocks the speaker opening. If one side sounds lower than the other, the issue may be a partially blocked mesh rather than a damaged earbud. Gentle cleaning can often improve volume balance and bring back detail that seemed lost.
Bass and treble balance can also change when earbuds are dirty. Bass depends heavily on a strong seal between the ear tip and the ear. If silicone tips are coated with oil or wax, they may not sit securely, which can make bass sound thin and weak. Treble can also become muted when the speaker mesh is covered. A clean ear tip and clean mesh help earbuds sound closer to how they were designed to sound.
| Performance Issue | Possible Cleaning Cause | What Cleaning Can Improve |
|---|---|---|
| Low volume | Wax over speaker mesh | Louder, clearer output |
| Weak bass | Dirty or loose ear tips | Better seal and fuller sound |
| Muffled vocals | Blocked acoustic grille | More detail and clarity |
| Uneven left/right sound | One mesh more blocked than the other | Better channel balance |
| Poor call quality | Dust or oil near microphone openings | Clearer voice pickup |
| Weak ANC or transparency mode | Blocked vents or microphones | Better environmental sound processing |
Cleaning also helps preserve advanced earbud features. Active noise cancellation, transparency mode, spatial processing, and call enhancement often rely on external microphones and vents. If those areas are blocked, the earbuds may not read the surrounding environment accurately. That means noise cancellation can feel weaker, transparency mode may sound unnatural, and calls may lose clarity.
Hygiene Benefits
Earbuds sit in one of the most sensitive areas of the body. Even if you are careful, they collect skin oils, sweat, dead skin cells, earwax, and moisture. If they are stored in pockets, bags, gym cases, or backpacks, they may also pick up lint, dust, and other debris before going back into the ear.
Regular cleaning helps reduce bacteria buildup and keeps the earbuds more comfortable to wear. This is especially important for people who use earbuds during workouts, wear them for long study or work sessions, or share earbuds with someone else. Sweat and warmth can make ear tips feel sticky, slippery, or unpleasant, while wax buildup can make earbuds feel less secure.
Cleaning can also help reduce odor. Earbud odor usually comes from a mix of sweat, skin oil, moisture, and residue trapped on silicone tips or inside the charging case. Removing and washing silicone tips separately, then drying them fully before reattaching, can make a noticeable difference.
| Hygiene Concern | Where It Builds Up | Cleaning Priority |
|---|---|---|
| Earwax | Speaker mesh and ear tips | Remove gently without pushing inward |
| Sweat | Ear tips and outer shell | Wipe after workouts |
| Skin oils | Earbud body and case | Clean with microfiber cloth |
| Odor | Silicone tips and case interior | Wash tips and dry completely |
| Bacteria | Ear-contact surfaces | Clean regularly, avoid sharing |
| Moisture | Tips, seams, case, contacts | Dry before charging or storing |
Cleaning earbuds does not replace good ear hygiene, and it does not guarantee protection from every ear issue. However, it does reduce the amount of residue that goes back into your ears. If you are prone to irritation, discomfort, or wax buildup, keeping earbuds clean can make them feel fresher and less intrusive during daily use.
The important rule is to clean carefully. Do not soak the earbuds themselves, do not pour liquid into the speaker mesh, and do not scrape aggressively. The safest approach is to clean removable parts separately, wipe electronic parts gently, and let everything dry fully before use.
Longevity Benefits
Clean earbuds usually last longer because dirt and moisture are two of the biggest enemies of small electronics. Earbuds are compact devices with charging pins, magnets, sensors, vents, microphones, batteries, and delicate speaker mesh. When wax or debris collects around these areas, it can create problems that look like hardware failure.
Charging issues are a common example. If the charging contacts on the earbuds or inside the case are dirty, one earbud may not sit properly, may charge slowly, or may fail to charge at all. A small amount of lint or oil on the contact point can interrupt the connection. Cleaning the contacts carefully can help maintain charging efficiency and reduce random battery problems.
Speaker mesh damage is another concern. When wax hardens over time, users may be tempted to scrape it off with sharp tools. That can puncture the mesh, push wax deeper, or damage the acoustic filter underneath. Regular light cleaning prevents buildup from becoming hard and difficult to remove.
| Longevity Issue | How Dirt Contributes | Preventive Cleaning Habit |
|---|---|---|
| Charging failure | Dirty pins or blocked case contacts | Wipe contacts and case wells gently |
| Mesh damage | Hardened wax requires aggressive cleaning | Clean lightly and regularly |
| Weak battery behavior | Earbud may not seat correctly in case | Keep case interior free of lint |
| Poor fit over time | Ear tips collect oil and lose grip | Wash or replace silicone tips |
| Case wear | Dust gathers around hinge and magnets | Brush seams and case edges |
| Microphone decline | Tiny openings collect dust and oil | Clean around mic holes carefully |
A consistent cleaning routine can delay replacement, protect sound quality, and keep the earbuds feeling newer for longer. This matters whether you own cheap earbuds, mid-range true wireless earbuds, or premium noise cancelling models. The more advanced the earbuds are, the more important maintenance becomes, because more features depend on tiny external openings staying clean.
The best approach is simple: wipe earbuds after heavy use, clean silicone tips regularly, inspect speaker mesh before buildup hardens, keep the charging case free of debris, and avoid using excessive liquid. Small habits can prevent many of the most common earbud problems before they turn into expensive replacements.
Step-by-Step Cleaning Guide
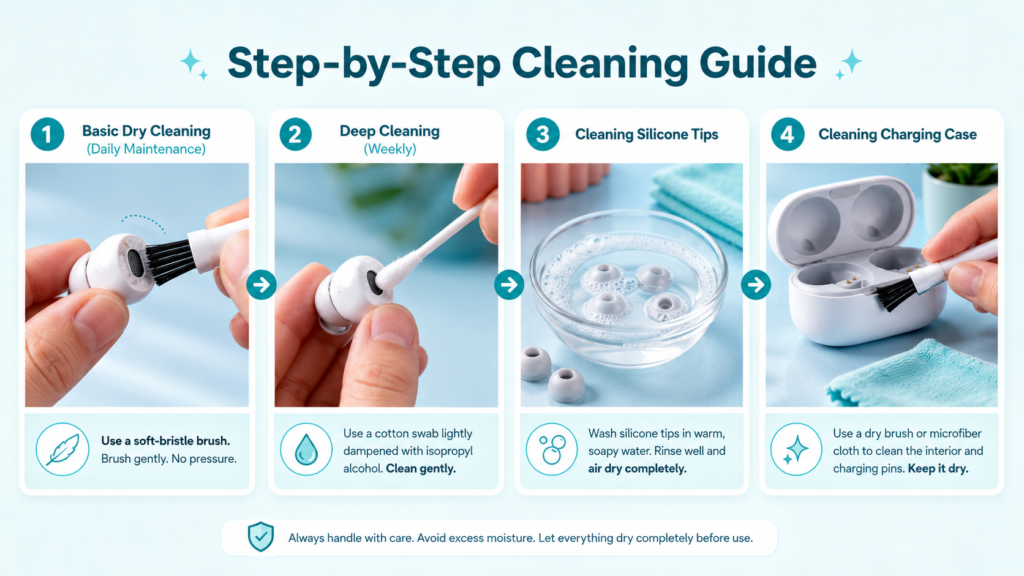
Knowing how to clean earbuds properly means using the right method for each part of the device. The speaker mesh, outer shell, microphones, charging contacts, case interior, and earbud rubber tips all collect different types of debris, so they should not be cleaned the same way. A soft brush may be enough for daily dust, but earwax, sweat, and oil usually require a more careful weekly routine.
The goal of cleaning earbuds is not to make them look new by force. It is to remove buildup without pushing wax deeper into the mesh, weakening the ear tips, damaging the acoustic filters, or introducing moisture into the electronics. Whether you use budget earbuds, premium ANC earbuds, gaming earbuds, or stylish earbuds with polished finishes, the safest cleaning process is gentle, controlled, and part-specific.
| Earbud Area | Best Cleaning Method | What to Avoid |
|---|---|---|
| Speaker mesh | Dry brushing first, light alcohol swab only if needed | Pressing wax into the grille |
| Outer shell | Microfiber cloth or lightly damp swab | Soaking or spraying directly |
| Earbud rubber tips | Remove, wash separately, dry fully | Reattaching while wet |
| Microphone openings | Gentle dry brushing around the hole | Poking inside with sharp tools |
| Charging pins | Dry swab or microfiber cloth | Moisture inside the case |
| Charging case | Dry brush and cloth | Liquid pooling near magnets or pins |
1. Basic Dry Cleaning: Daily Maintenance
Daily dry cleaning is the safest way to keep earbuds clean before buildup becomes difficult to remove. This should be a light maintenance step, not a deep scrub. After use, especially after commuting, workouts, calls, or long listening sessions, remove the earbuds from your ears and inspect the speaker mesh, ear tips, and outer shell.
Use a soft-bristle brush, a clean dry toothbrush, or a small brush from an earphone cleaning kit. Hold the earbud with the speaker mesh facing downward so loose debris falls away from the grille instead of being pushed deeper inside. Gently brush around the mesh, seams, vents, and microphone openings. Do not press hard into the speaker grille, because pressure can compact earwax into the mesh and make muffled sound worse.
Daily dry cleaning is especially useful for users who wear earbuds at the gym, carry them in pockets, or use them in dusty environments. A quick 30-second wipe can prevent wax, lint, and oil from hardening around the acoustic openings.
| Daily Cleaning Step | How to Do It | Why It Helps |
|---|---|---|
| Brush mesh gently | Keep the mesh facing downward | Removes loose wax and dust safely |
| Wipe outer shell | Use a dry microfiber cloth | Removes oil and fingerprints |
| Check earbud rubber tips | Look for wax or sweat residue | Preserves comfort and seal |
| Inspect charging contacts | Look for lint or residue | Prevents charging inconsistency |
| Clean before storing | Wipe before placing in case | Keeps the case cleaner for longer |
Daily maintenance should stay dry whenever possible. Liquids are not needed for routine dust and light debris. If the earbuds look clean and sound normal, a soft brush and cloth are usually enough.
2. Deep Cleaning: Weekly or When Sound Becomes Muffled
Deep cleaning is useful when earbuds look visibly dirty, sound muffled, feel sticky, or have been exposed to sweat, dust, or heavy use. This step is more detailed than daily cleaning, but it still needs to be controlled. The biggest mistake is using too much liquid.
Start by removing the ear tips if your earbuds have removable earbud rubber tips. Set the tips aside for separate washing. Then use a dry brush to remove loose debris from the mesh and outer shell before adding any cleaning solution. This prevents alcohol or moisture from turning dust and wax into a sticky layer.
For the outer shell and non-sensitive surfaces, dip a cotton swab lightly in 70% isopropyl alcohol, then squeeze or press out the excess liquid. The swab should be damp, not dripping. Gently clean the outer plastic, stem, touch-control area, and edges around the mesh. If cleaning near the speaker grille, avoid soaking the mesh. Use light strokes around the surface rather than pushing into it.
After cleaning, place the earbuds on a dry microfiber cloth and let them air dry completely before wearing or charging them. Do not use a hair dryer, heater, or direct sunlight, because heat can damage adhesives, batteries, plastic, and silicone parts.
| Deep Cleaning Area | Recommended Tool | Safe Method |
|---|---|---|
| Outer shell | Lightly damp alcohol swab | Wipe gently, avoid dripping liquid |
| Speaker mesh | Dry brush first, minimal damp swab if needed | Clean surface only, do not press inward |
| Microphones | Dry brush | Brush around openings, never poke inside |
| Touch controls | Microfiber cloth | Remove oil and fingerprints |
| Seams and edges | Cotton swab | Clean lightly along grooves |
Deep cleaning should not be done aggressively. If the mesh is heavily blocked, repeated gentle cleaning is safer than one forceful attempt. If the blockage does not improve, the issue may require replacement filters, new ear tips, or professional service depending on the earbud model.
3. Cleaning Earbud Rubber Tips and Silicone Tips
The ear tips are usually the dirtiest part of earbuds because they touch the ear canal directly. Earbud rubber tips and silicone tips collect earwax, sweat, oil, and bacteria more quickly than the hard earbud shell. Cleaning them separately is one of the easiest ways to improve hygiene, comfort, bass response, and passive isolation.
First, remove the tips carefully from the earbuds. Do not pull at an extreme angle or stretch them too hard, because thin silicone can tear over time. Once removed, rinse the tips with warm water and a small amount of mild soap. Rub them gently between your fingers to loosen wax and oil. Avoid harsh detergents, bleach, strong disinfectants, or scented cleaners, because residue can irritate the ear.
After washing, rinse the tips thoroughly to remove soap. Then dry them with a lint-free cloth and leave them to air dry completely. This step is critical. Never reattach wet tips to earbuds, because moisture can travel toward the mesh or sit inside the ear tip opening.
| Ear Tip Cleaning Step | What to Do | Why It Matters |
|---|---|---|
| Remove tips first | Pull gently from the base | Prevents moisture from reaching electronics |
| Wash with mild soap | Use warm water and gentle rubbing | Removes wax, sweat, and oil |
| Rinse thoroughly | Remove all soap residue | Prevents skin irritation |
| Dry completely | Use cloth plus air drying | Protects speaker mesh from moisture |
| Inspect for wear | Look for tears or looseness | Maintains fit and sound seal |
Clean ear tips also help earbuds sound better. If the tips are oily, loose, or blocked with wax, they may not seal properly. A weak seal can reduce bass, weaken ANC, and make earbuds feel unstable. If your tips remain sticky, stretched, cracked, or uncomfortable after cleaning, replacement may be better than repeated washing.
4. Cleaning the Charging Case
The charging case is often ignored, but it can collect as much dirt as the earbuds themselves. Dust, lint, pocket debris, wax residue, and skin oils can build up around the charging wells, magnets, hinge, lid edges, and charging pins. If the case becomes dirty, clean earbuds can become dirty again every time you store them.
Use a dry soft brush or microfiber cloth to clean the case interior. Focus on the charging wells where each earbud sits. If you see lint around the charging pins, use a dry cotton swab and gentle circular motion. Do not pour liquid into the case, spray cleaner inside, or use a wet cloth near the charging contacts. Moisture inside the case can interfere with charging or damage internal components.
For the outside of the case, a microfiber cloth is usually enough. If the case has fingerprints or oil buildup, use a barely damp cloth on the exterior only, then dry it immediately. Keep moisture away from the USB-C or Lightning port, hinge, case seams, and internal charging pins.
| Charging Case Area | Cleaning Tool | Safety Note |
|---|---|---|
| Charging wells | Dry cotton swab | Avoid moisture near pins |
| Charging contacts | Dry swab or microfiber cloth | Clean gently, do not scrape |
| Case hinge | Soft brush | Remove dust without forcing debris inward |
| Exterior shell | Microfiber cloth | Light damp wipe only if needed |
| Charging port | Dry brush or air blower | Never insert liquid or metal tools |
A clean case helps maintain charging efficiency. If one earbud is not charging properly, check the case before assuming the battery is failing. Small debris around the contact points can prevent the earbud from sitting correctly.
Safe Cleaning Routine Summary
| Frequency | What to Clean | Best Method |
|---|---|---|
| After each heavy use | Outer shell and ear tips | Dry microfiber wipe |
| Daily or every few uses | Mesh, tips, case surface | Soft dry brush |
| Weekly | Earbud rubber tips and outer shell | Wash tips separately, wipe earbuds carefully |
| Monthly | Charging case, pins, seams, ports | Dry brush and swab |
| When sound is muffled | Speaker mesh and ear tips | Gentle dry cleaning first, then careful deep cleaning |
The safest rule is simple: clean the removable parts more thoroughly and the electronic parts more carefully. Wash the ear tips, wipe the shell, brush the mesh, keep the case dry, and never force tools into tiny openings. With consistent maintenance, your earbuds will stay cleaner, sound clearer, charge more reliably, and last longer.
Cleaning by Earbud Type
Not all earbuds should be cleaned the same way. A simple wired pair, a true wireless model with a charging case, and premium ANC earbuds all have different weak points. Some collect grime around cables and connectors. Others fail because wax or dust blocks charging contacts. Noise cancelling models need extra care because microphones and vents are part of the ANC system.
The safest approach is to match the cleaning method to the earbud type. You still want the same outcome—clean earbuds, clearer sound, better hygiene, and longer lifespan—but the areas that need attention are different. For example, earbud rubber tips can often be removed and washed separately, but charging contacts, microphone openings, speaker mesh, and cable connectors should be cleaned with much more care.
| Earbud Type | Main Cleaning Focus | Biggest Risk | Best Cleaning Method |
|---|---|---|---|
| Wired earbuds | Cable, jack, mesh, ear tips | Liquid near the connector | Dry wipe, gentle brush, minimal moisture |
| True wireless earbuds | Charging contacts, case, mesh, ear tips | Moisture inside charging case | Dry brushing, careful swab cleaning |
| Noise cancelling earbuds | Microphones, vents, mesh, ear tips | Blocking ANC microphones or vents | Gentle dry cleaning around openings |
| Sports earbuds | Sweat, silicone tips, stabilizers | Moisture residue and odor | Wash removable tips, dry fully |
| Premium earbuds | Mesh, finish, sensors, case | Scratches or damaged acoustic filters | Soft tools, light pressure, controlled cleaning |
Wired Earbuds
Wired earbuds are usually simpler than true wireless models, but they still need regular cleaning. The speaker mesh can collect earwax, the cable can collect sweat and skin oil, and the 3.5mm jack or USB-C/Lightning connector can gather pocket lint and dust. If you use wired earbuds for gaming, calls, commuting, or long listening sessions, the cable and connector can become just as dirty as the ear tips.
Start by wiping the cable with a dry microfiber cloth. If the cable feels sticky, use a cloth that is only slightly damp, then dry it immediately. Do not soak the cable or allow liquid to run toward the connector. For the jack or plug, use a dry cloth or soft brush only. Liquid near connectors can cause corrosion, poor contact, or device recognition problems.
If your wired earbuds have earbud rubber tips, remove them before cleaning. Wash the tips separately with warm water and mild soap, rinse thoroughly, and let them dry completely before reattaching. The speaker mesh should be cleaned with a dry soft brush while the mesh faces downward, so loose wax falls away instead of being pushed inside.
| Wired Earbud Area | How to Clean It | What to Avoid |
|---|---|---|
| Cable | Wipe with microfiber cloth | Soaking or using harsh cleaners |
| 3.5mm jack / USB-C connector | Dry cloth or soft brush | Alcohol dripping into connector |
| Speaker mesh | Brush gently with mesh facing down | Pressing wax into the grille |
| Earbud rubber tips | Remove, wash, rinse, dry fully | Reattaching while damp |
| Inline microphone | Dry wipe around opening | Poking into the mic hole |
For wired models, the main rule is simple: clean the parts that touch your ear more thoroughly, but keep liquid far away from the connector and inline controls.
True Wireless Earbuds
True wireless earbuds need extra care because they rely on small charging contacts, magnets, sensors, and a charging case. A wired earbud may keep working even if the cable is slightly dirty, but true wireless earbuds can stop charging properly if one tiny contact point is blocked by wax, lint, or oil.
When cleaning earbuds in this category, always clean the earbuds and the case together. If you clean only the earbuds but leave the case dirty, wax and dust can transfer back onto the earbuds every time you store them. Start with a dry microfiber cloth on the outer shell, then use a soft brush around the speaker mesh, vents, and seams. Keep the mesh facing downward while brushing.
The charging contacts deserve special attention. Use a dry cotton swab or microfiber cloth to wipe the metal contact points on the earbuds and inside the case. Avoid moisture inside the case wells. Even a small amount of liquid can interfere with charging pins, magnets, or internal electronics.
Modern true wireless earbuds with active noise cancelling often include additional microphones, vents, sensors, and app-controlled features, so careless cleaning can affect more than basic sound. Dirty contacts can affect charging, blocked microphones can affect calls, and clogged vents can affect ANC or transparency mode.
| True Wireless Area | Cleaning Priority | Safe Method |
|---|---|---|
| Earbud body | Remove oil and fingerprints | Dry microfiber wipe |
| Speaker mesh | Remove wax and dust | Soft dry brush, light pressure |
| Charging contacts | Maintain charging reliability | Dry cotton swab |
| Charging case wells | Remove lint and wax residue | Dry brush or swab |
| Case exterior | Keep clean and presentable | Microfiber cloth |
| Earbud rubber tips | Improve hygiene and seal | Remove, wash, dry fully |
True wireless earbuds should never be placed into the charging case while wet. Even if only the tips were washed, wait until they are fully dry before reattaching and storing them.
Noise Cancelling Earbuds
Noise cancelling earbuds require the most careful cleaning because ANC depends on microphones and vents that detect surrounding sound. If those tiny openings become blocked by dust, oil, sweat, or wax, active noise cancellation may feel weaker, transparency mode may sound less natural, and call quality may drop.
Premium ANC earbuds often have multiple microphones on each side. Some are used for calls, some for external noise detection, and some for internal ANC processing. These openings are small and easy to damage. When cleaning around them, use a soft dry brush and very light pressure. Do not insert pins, toothpicks, needles, or metal tools into microphone holes or ANC vents.
If your earbuds use earbud rubber tips, clean them regularly because the seal directly affects ANC performance. A dirty or slippery silicone tip may not sit properly in the ear canal, which weakens passive isolation and makes ANC work harder. Clean tips help the earbuds sit securely, preserve bass response, and improve the overall noise cancelling experience.
| ANC Earbud Area | Why It Matters | Cleaning Advice |
|---|---|---|
| External microphones | Detect outside noise for ANC | Brush gently around openings |
| Internal microphones | Help process in-ear sound | Avoid moisture and pressure |
| ANC vents | Support pressure and noise control | Do not block or poke |
| Speaker mesh | Affects sound clarity | Remove wax carefully |
| Earbud rubber tips | Affects seal and ANC strength | Wash separately and dry fully |
| Charging case | Protects battery and contacts | Keep dry and lint-free |
Noise cancelling earbuds should be cleaned more gently than basic earbuds. The goal is not to scrub every tiny opening aggressively. The goal is to keep openings clear without damaging the parts that make ANC work.
Cleaning Priority by Earbud Type
| Cleaning Task | Wired Earbuds | True Wireless Earbuds | Noise Cancelling Earbuds |
|---|---|---|---|
| Clean earbud rubber tips | High | High | Very high |
| Brush speaker mesh | High | High | High |
| Clean cable | Very high | Not applicable | Not applicable |
| Clean charging contacts | Not applicable | Very high | Very high |
| Clean charging case | Not applicable | Very high | Very high |
| Clean microphones gently | Medium | High | Very high |
| Avoid moisture | High | Very high | Very high |
| Avoid blocking vents | Medium | High | Very high |
Best Practice Summary
The safest cleaning method depends on the type of earbuds you own:
| Earbud Type | Best Routine |
|---|---|
| Wired earbuds | Wipe cable, clean mesh, wash removable tips, keep connectors dry |
| True wireless earbuds | Clean earbuds and case together, protect charging contacts, avoid moisture |
| Noise cancelling earbuds | Clean microphones and vents gently, keep ear tips clean for proper ANC seal |
No matter which type you use, the core rule is the same: clean earbuds regularly, but do not force liquid or tools into delicate openings. Clean the removable parts more thoroughly, clean the electronic parts more carefully, and always let everything dry completely before use or charging.
Best Tools & Products for Cleaning Earbuds
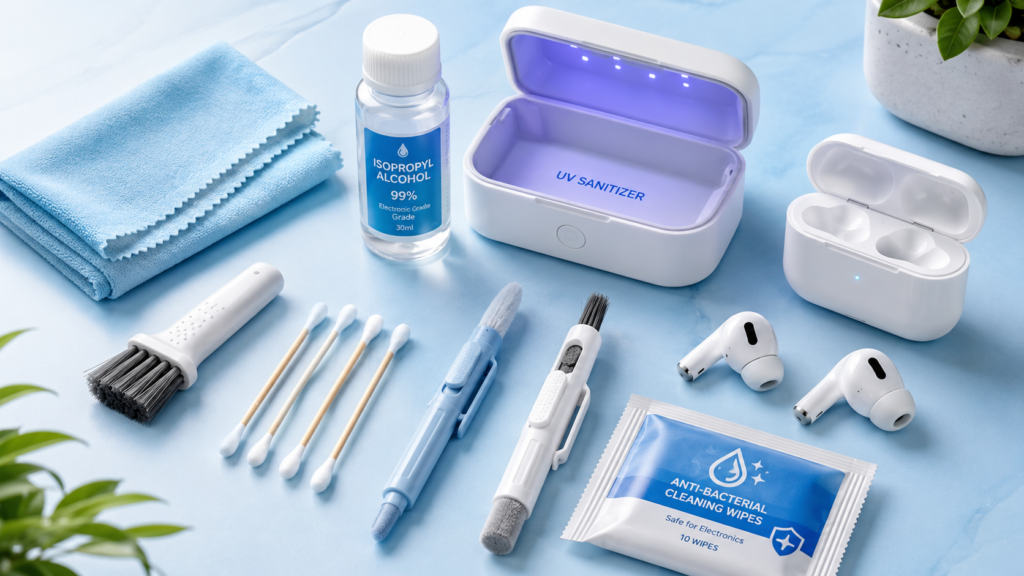
Choosing the right earbud cleaning tools matters because earbuds are small, delicate, and easy to damage with too much pressure or moisture. A good cleaning setup should remove wax, dust, lint, skin oil, and debris without pushing dirt deeper into the speaker mesh or charging contacts.
Essential Earbud Cleaning Kit
An essential earbud cleaning kit should include the basics: a microfiber cloth, soft brush, cotton swabs, and a small amount of isopropyl alcohol for careful exterior cleaning. This setup is best for regular maintenance and light buildup.
| Tool | Best For | Why It Helps | Risk Level |
|---|---|---|---|
| Microfiber cloth | Exterior surfaces and charging case | Removes fingerprints, oil, and dust without scratching | Low |
| Soft brush | Speaker mesh and seams | Lifts dry wax and debris gently | Low |
| Cotton swabs | Case grooves and earbud edges | Reaches small corners and tight areas | Medium |
| Isopropyl alcohol | Exterior sanitizing | Helps remove oil and grime when used lightly | Medium |
Short review:
A basic earbud cleaning kit is the safest choice for most users because it avoids aggressive tools and keeps moisture under control. The microfiber cloth handles surface cleaning, while the soft brush is useful for speaker mesh and small openings. Cotton swabs work well around charging cases and earbud seams, but they should be used gently to avoid pushing debris into ports or mesh. Isopropyl alcohol can help with oily buildup, but it should never be poured directly onto earbuds.
Best for: Daily cleaning, light wax buildup, charging case maintenance, and safe routine care.
Advanced Earbud Cleaning Tools
Advanced cleaning tools are useful when earbuds have heavier buildup, stubborn debris, or hygiene concerns. These include UV sanitizer boxes, earbud cleaning pens, anti-bacterial wipes, and cleaning putty.
| Tool | Best For | Why It Helps | Watch-Out |
|---|---|---|---|
| UV sanitizer box | Bacteria reduction | Sanitizes without liquid contact | Does not remove wax or dirt by itself |
| Earbud cleaning pen | Mesh, grooves, and case crevices | Combines brush, tip, and sponge-style tools | Metal tips require careful use |
| Anti-bacterial wipes | Outer surfaces | Fast surface cleaning | Avoid excess moisture near mesh |
| Cleaning putty | Dust and loose debris | Pulls dirt from small openings and gaps | Must not be forced into speaker mesh |
Short review:
Advanced tools are best for users who clean earbuds often or want a more complete maintenance routine. A UV sanitizer box is useful for hygiene, but it should not replace physical cleaning because it does not remove wax or lint. Earbud cleaning pens are practical because they combine several tools in one compact design. Anti-bacterial wipes are convenient for travel, but they should be used carefully so liquid does not enter the speaker grille. Cleaning putty can be helpful for dust and loose particles, especially around cases and ports, but it should be used lightly.
Best for: Deep cleaning, frequent earbud users, shared earbuds, travel hygiene, and detailed maintenance.
20-in-1 AirPod Cleaner Kit Pro Review

- Professional & Powerful: Say goodbye to dirt, grime, and earwax with our 20-in-1 keyboard cleaner Kit. The metal tip cle…
- Safe for All AirPod Models & Other Brands: The earbud cleaning kit works with all AirPod models (AirPods, AirPods Pro, A…
- Multi-Function & Thoughtful Cleaning Tool: The electronics cleaning kit cleans more than just AirPods—it’s perfect for h…
The 20-in-1 AirPod Cleaner Kit Pro is a full maintenance kit designed for earbuds, headphones, phones, laptops, keyboards, and screens. It includes multiple cleaning tools such as a metal tip, soft brush, flocking sponge, 15ml spray, cloth, and cleaning putty.
| Feature | Review |
|---|---|
| Cleaning coverage | Very broad; useful for earbuds, cases, keyboards, screens, and ports |
| Best tool included | Soft brush and flocking sponge for earbud and case cleaning |
| Convenience | Strong; combines many tools in one kit |
| Risk level | Medium if the metal tip is used too aggressively |
| Best use | Full earbud maintenance and multi-device cleaning |
Short review:
The 20-in-1 AirPod Cleaner Kit Pro is a practical all-in-one option for users who want more than a basic cloth-and-brush setup. The soft brush can help remove loose debris from earbud mesh and seams, while the flocking sponge is useful for cleaning charging case wells. The included spray and cloth make it more versatile for screens and device surfaces, and the putty can help lift dust from tight spaces.
The main advantage is convenience. Instead of buying separate tools, this kit gives you a complete set for earbuds, phones, laptops, keyboards, and screens. The only caution is the metal tip. It may be useful for stubborn buildup around non-delicate areas, but it should not be pressed into speaker mesh, microphone holes, or charging contacts.
Best for: Users who want one cleaning kit for earbuds, AirPods, phones, laptops, keyboards, and screens.
Verdict:
A strong full-maintenance pick for people who want a complete cleaning kit, but delicate parts like mesh and microphones should be cleaned with the soft brush or sponge instead of the metal tip.
Cleaning Putty for Electronics Review

- PRO-LEVEL CLEAN FOR HARD-TO-REACH AREAS – Dust and lint hide deep inside charging ports, speaker grills, and earbuds. Th…
- HELPS MAINTAIN DEVICE PERFORMANCE – Clogged ports and dirty earbuds reduce sound and charging. This earbud cleaning kit …
- ALL-IN-ONE PHONE & PORT CLEANING KIT – Includes cleaning putty and precision tools for charging ports, speakers, and ele…
The Cleaning Putty for Electronics – Earbud & Phone Cleaning Kit with Precision Tools is designed for earbuds, phones, charging ports, and small electronic gaps. It focuses on removing dust, lint, and debris from areas that are difficult to reach with a cloth or brush.
| Feature | Review |
|---|---|
| Cleaning coverage | Good for earbuds, phone ports, case seams, and small gaps |
| Best tool included | Cleaning putty for lifting dust and loose debris |
| Convenience | Easy to use for quick maintenance |
| Risk level | Low to medium, depending on pressure and placement |
| Best use | Charging case grooves, ports, seams, and loose debris removal |
Short review:
This cleaning putty kit is best for small electronics that collect dust and lint over time. For earbuds, it can help lift loose debris from charging case wells, outer seams, and shallow openings. For phones, it may be useful around charging ports and speaker areas when used carefully.
The benefit of cleaning putty is that it can pick up debris instead of pushing it around. However, it should not be forced deeply into earbud speaker mesh, microphone holes, or charging ports. Used lightly, it is a helpful accessory for routine electronics cleaning. Used aggressively, it can leave residue or push material into delicate areas.
Best for: Earbud charging cases, phone ports, small crevices, dust removal, and light electronics maintenance.
Verdict:
A useful precision-cleaning option for dust and lint, especially around cases and ports. It works best as a supporting tool alongside a soft brush and microfiber cloth, not as the only earbud cleaning method.
👉 Upgrade your cleaning kit for better hygiene and longer earbud life
Cleaning Methods Comparison
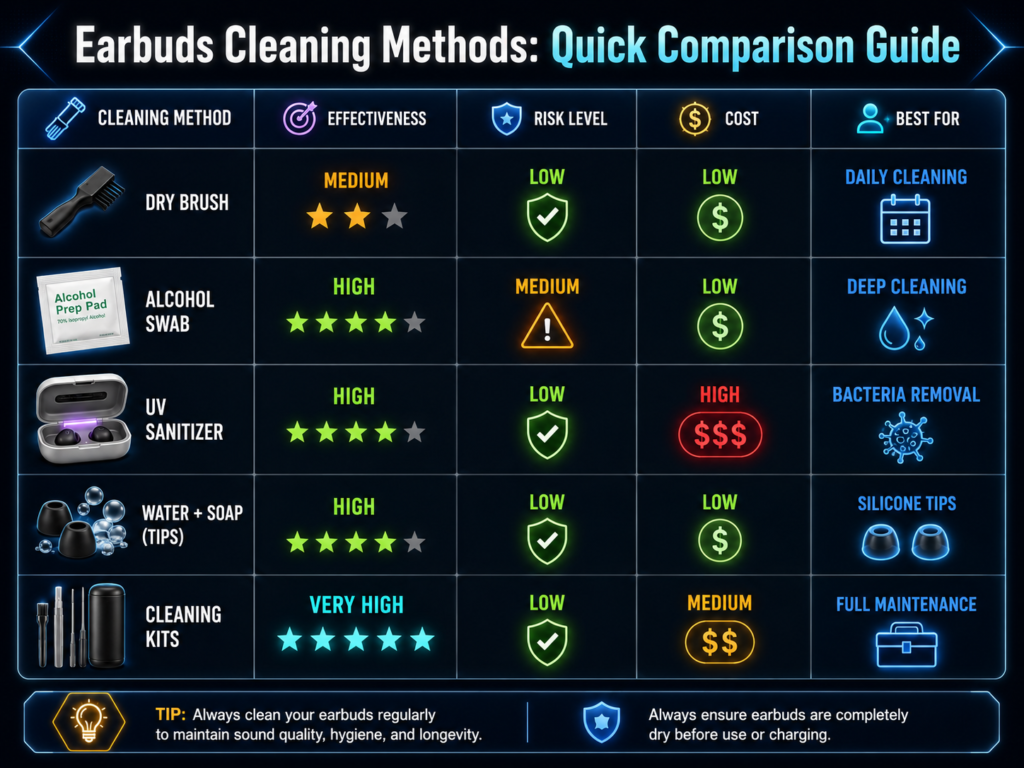
| Cleaning Method | Effectiveness | Risk Level | Cost | Best For |
|---|---|---|---|---|
| Dry Brush | Medium | Low | Low | Daily cleaning |
| Alcohol Swab | High | Medium | Low | Deep cleaning |
| UV Sanitizer | High | Low | High | Bacteria removal |
| Water + Soap (Tips) | High | Low | Low | Silicone tips |
| Cleaning Kits | Very High | Low | Medium | Full maintenance |
Costs & Budget Options
| Option | Price Range | Frequency |
|---|---|---|
| DIY Cleaning | $0–$5 | Weekly |
| Cleaning Kits | $10–$25 | Monthly |
| UV Sanitizers | $30–$80 | Optional |
👉 Start with a low-cost DIY method before investing in advanced tools
Risks & What to Avoid
Common Mistakes
- Using excessive water
- Pushing debris deeper into mesh
- Using sharp objects (pins, needles)
- Cleaning while earbuds are powered on
Potential Risks
- Permanent speaker damage
- Reduced audio quality
- Battery or charging issues
Latest Trends & Tech
Earbud cleaning is becoming more advanced because modern earbuds are no longer simple audio accessories. Today’s earbuds include microphones, ANC vents, sensors, charging contacts, touch panels, moisture-resistant materials, and compact charging cases that are used daily in gyms, offices, airports, buses, trains, and shared workspaces. As earbuds become more personal and more frequently worn, hygiene and maintenance are becoming part of the buying conversation.
The newest cleaning-related innovations focus on three areas: reducing microbial buildup, protecting the speaker mesh from moisture and debris, and making routine maintenance easier for users. These technologies do not remove the need for an earbuds cleaning kit, regular wiping, or proper care of earbud rubber tips, but they can make earbuds easier to maintain over time.
| Trend | What It Does | What It Does Not Replace |
|---|---|---|
| Self cleaning earbuds | Reduce buildup through coatings, case design, or automated cleaning ideas | Manual cleaning of tips, mesh, and case |
| UV charging cases | Use UV light to reduce surface microbes inside the case | Physical removal of wax, lint, and oil |
| Hydrophobic mesh technology | Helps resist moisture around acoustic openings | Careful drying after sweat or rain exposure |
| Better cleaning kits | Provide brushes, swabs, putty, and precision tools | Safe technique and regular maintenance |
| Replaceable ear tips | Make hygiene easier and improve fit over time | Cleaning the earbud body and case |
1. Self-Cleaning Earbuds
Self cleaning earbuds are an emerging idea in earbud design, but the phrase should be understood carefully. Most earbuds do not literally clean themselves in the way a dishwasher cleans dishes. Instead, self-cleaning usually refers to materials, coatings, case features, or design choices that help reduce bacterial buildup, moisture retention, or debris accumulation.
Some future-facing models and concepts focus on anti-bacterial coatings, smoother surfaces, moisture-resistant mesh, or charging cases that support cleaner storage. These features may help reduce surface contamination, but they do not remove earwax, skin oils, or lint in the way manual cleaning does. Wax and oil still need physical removal because they can block speaker mesh, weaken sound, affect fit, and collect around earbud rubber tips.
Self-cleaning technology is most useful when it supports a normal cleaning routine. For example, an anti-bacterial surface may help reduce microbial growth, but the user still needs to wipe the earbud body, wash removable silicone tips, and keep the charging case free of lint. A self-cleaning claim should never be treated as permission to ignore hygiene.
| Self-Cleaning Feature | Potential Benefit | User Still Needs To |
|---|---|---|
| Anti-bacterial coating | May reduce surface bacteria on treated areas | Wipe wax, oil, and sweat manually |
| Smooth shell design | Makes earbuds easier to wipe clean | Clean seams, mesh, and tips |
| Moisture-resistant material | Helps reduce sweat-related buildup | Dry earbuds before charging |
| Cleaner case design | Reduces debris traps inside the case | Brush case wells and contacts |
| Replaceable filters or tips | Makes maintenance easier | Replace worn parts when needed |
Even the most advanced self cleaning earbuds still need human care, especially around the speaker mesh, microphone openings, charging pins and removable ear tips.
2. UV Charging Cases
UV charging cases are another hygiene-focused trend. These cases use built-in ultraviolet light to reduce certain microbes on earbud surfaces while the earbuds are stored. The idea is simple: you place the earbuds in the case, close the lid, and the case runs a short sterilization cycle while also charging the earbuds.
This sounds convenient, but users should understand the limitation. UV light may help with surface-level sanitation, but it does not remove physical debris. Earwax, dried sweat, dust, lint, and skin oil still need to be cleaned manually. If wax is covering the mesh or stuck inside earbud rubber tips, a UV cycle will not brush it away. That is why UV cases work best when paired with a normal earbuds cleaning kit.
A good cleaning routine still includes a soft brush, microfiber cloth, dry cotton swab, and careful washing of removable silicone or rubber tips. UV can support hygiene, but it should not replace actual cleaning.
| UV Case Benefit | Useful For | Limitation |
|---|---|---|
| Surface sanitation | Reducing some microbes on exposed surfaces | Does not remove wax or oil |
| Convenience | Automatic cleaning support while charging | Only works on areas exposed to UV light |
| Odor reduction support | May help with freshness when used regularly | Odor source still needs physical cleaning |
| Travel hygiene | Useful for frequent commuters and travelers | Case still needs manual cleaning |
| Gym users | Helpful after sweat exposure | Ear tips still need washing and drying |
UV charging cases are most valuable for users who wear earbuds heavily: gym users, commuters, travelers, professionals, and anyone who stores earbuds in bags or pockets throughout the day. They add another layer of hygiene, but they are not a substitute for removing buildup from the parts that touch your ears.
3. Hydrophobic Mesh Technology
Hydrophobic mesh technology is designed to reduce moisture buildup around the speaker grille and acoustic openings. In simple terms, hydrophobic materials resist water. For earbuds, that can help protect delicate areas from sweat, humidity, light rain, or condensation. This matters because moisture can affect sound, encourage residue buildup, and create long-term reliability problems if earbuds are stored wet.
For people who use earbuds while exercising, commuting, or traveling, hydrophobic mesh can be useful because earbuds often move between warm ears, cool air, pockets, and charging cases. That temperature and moisture change can leave condensation or sweat residue around tiny openings. A moisture-resistant mesh helps reduce the chance of liquid sitting directly on sensitive acoustic areas.
However, hydrophobic mesh does not make earbuds invincible. It does not mean the earbuds should be washed under running water, soaked, or placed into the charging case while damp. It also does not stop wax or dust from collecting over time. Users still need to clean earbuds with dry tools first, then use minimal moisture only where appropriate.
| Hydrophobic Feature | Helps With | Still Requires |
|---|---|---|
| Moisture-resistant mesh | Sweat and humidity exposure | Drying before charging |
| Better acoustic protection | Less moisture near speaker openings | Gentle mesh brushing |
| Improved durability support | Reduced moisture stress over time | Regular cleaning routine |
| Sports and travel use | More confidence in active environments | Cleaning ear tips after sweat |
| Cleaner sound path | Less moisture-related muffling | Wax and lint removal |
Hydrophobic mesh is especially valuable in premium earbuds that rely on clean acoustic pathways for ANC, transparency mode, call quality, and spatial processing. A blocked or wet vent can affect more than music. It can also reduce microphone accuracy and environmental sound processing.
4. Smarter Earbuds Cleaning Kits
As earbuds become more complex, the earbuds cleaning kit category is also improving. Basic cleaning used to mean a cloth and a cotton swab. Now, many kits include soft brushes, cleaning putty, microfiber cloths, air blowers, fine swabs, silicone tip trays, and tools shaped specifically for charging case grooves.
A good kit helps users clean more precisely without using unsafe objects like needles, pins, knives, or metal scrapers. The best tools are soft enough to protect mesh and microphones, but structured enough to remove wax from edges and case seams. Cleaning putty can be useful for lifting dust and debris from shallow grooves, but it should not be pressed deep into speaker mesh or microphone holes.
| Cleaning Kit Tool | Best Use | Avoid |
|---|---|---|
| Soft brush | Mesh surface, seams, case edges | Hard scrubbing |
| Microfiber cloth | Outer shell and case exterior | Rough towels |
| Dry cotton swab | Charging wells and contacts | Wet swabs inside case |
| Cleaning putty | Lifting dust from shallow areas | Pushing into mesh |
| Air blower | Removing loose dust | High-pressure compressed air |
| Tip cleaning tray | Washing removable ear tips | Washing earbuds themselves |
A cleaning kit is most useful when combined with proper technique. The tool does not matter if the user presses too hard, uses too much liquid, or reattaches wet tips. For safe maintenance, clean removable parts more thoroughly and clean electronic parts more carefully.
5. Replaceable and Better-Designed Earbud Rubber Tips
One of the most practical cleaning trends is not futuristic at all: better earbud rubber tips. Ear tips are becoming more important because they affect hygiene, comfort, bass response, passive isolation, and ANC performance. A clean, flexible, well-fitting tip can make earbuds sound fuller and feel more secure. A dirty, stretched, oily, or cracked tip can make even expensive earbuds feel uncomfortable and weak.
More users are also replacing ear tips instead of replacing the entire earbud. This is often the smarter move. If the earbuds still work well but feel slippery, smell unpleasant, or no longer seal properly, new earbud rubber tips may restore comfort and sound at a much lower cost.
| Ear Tip Condition | What It Means | Best Action |
|---|---|---|
| Sticky or oily | Sweat and skin oil buildup | Wash or replace |
| Cracked silicone | Material is wearing out | Replace |
| Loose fit | Tip has stretched | Replace |
| Yellowing or odor | Long-term residue buildup | Deep clean or replace |
| Weak bass | Poor seal or blocked tip opening | Clean or try new size |
| Ear discomfort | Wrong size or worn material | Change size or replace |
Earbud hygiene depends heavily on the tips because they touch the ear directly. Even if future earbuds become more self-cleaning, removable ear tips will still need washing, drying, and replacement over time.
Trend Summary: What Actually Matters
| Technology Trend | Worth Paying Attention To? | Editorial Takeaway |
|---|---|---|
| Self cleaning earbuds | Yes, but with realistic expectations | Helpful support, not a full cleaning replacement |
| UV charging cases | Useful for hygiene-focused users | Good for surface sanitation, not wax removal |
| Hydrophobic mesh | Very useful for sweat and travel | Helps protect openings, but still needs cleaning |
| Earbuds cleaning kit tools | Highly practical | Best for safe routine maintenance |
| Better earbud rubber tips | Essential | Improves comfort, sound, seal, and hygiene |
The future of earbud maintenance is not just about one magic feature. It is about combining smarter materials, cleaner case design, better moisture resistance, safer tools, and replaceable parts. For now, the best approach is still simple: use an earbuds cleaning kit carefully, wash removable earbud rubber tips, keep the charging case dry, and treat self cleaning earbuds as maintenance-friendly rather than maintenance-free.
FAQs
How often should you clean earbuds if you use them every day?
You should clean earbuds at least once per week if you use them casually, and you should wipe them daily if you wear them for workouts, commuting, calls, gaming, or long listening sessions. Earbuds collect earwax, sweat, skin oils, dust, lint, and moisture every time they touch your ears or sit inside a pocket, backpack, charging case, gym bag, or desk drawer. Even when they do not look dirty, buildup may already be forming around the speaker mesh, microphone openings, charging contacts, and ear tips.
For daily users, the best routine is simple: wipe the outer shell after use, brush the speaker mesh gently every few days, wash removable silicone ear tips weekly, and clean the charging case at least once or twice per month. If you use earbuds during exercise, clean the ear tips and outer shell after every sweaty session. Sweat dries into a sticky residue that can make earbud rubber tips feel slippery, create odor, and weaken the seal inside the ear.
| Usage Type | Recommended Cleaning Frequency | What to Clean |
|---|---|---|
| Light casual use | Once per week | Outer shell, ear tips, speaker mesh |
| Daily music/calls | 2–3 times per week | Mesh, ear tips, case surface |
| Gym or running use | After every workout | Ear tips, shell, moisture-prone areas |
| Heavy travel/commuting | 2–3 times per week | Case, contacts, tips, mesh |
| Shared earbuds | Before and after sharing | Ear tips and ear-contact surfaces |
| Muffled sound | Immediately | Speaker mesh and ear tips |
Quick cleaning schedule
| Task | Daily | Weekly | Monthly |
|---|---|---|---|
| Wipe earbud shell | Yes | Yes | Yes |
| Brush speaker mesh | Optional | Yes | Yes |
| Wash silicone ear tips | No | Yes | Yes |
| Clean charging pins | No | Optional | Yes |
| Deep clean case | No | Optional | Yes |
The safest habit is to clean lightly and often instead of waiting until wax hardens. Regular maintenance keeps earbuds cleaner, helps preserve sound quality, and reduces the risk of damaging the mesh through aggressive cleaning later.
Can I use water to clean earbuds without damaging them?
You should only use water on removable silicone ear tips, earbud rubber tips, or washable covers—not on the electronic earbud body, speaker mesh, microphones, charging contacts, or charging case. This is one of the most important rules of cleaning earbuds safely. Even if your earbuds are water-resistant, that does not mean they should be rinsed, soaked, or washed under running water.
Water can enter small openings and create problems inside the speaker driver, microphone ports, ANC vents, charging contacts, or battery area. A water-resistant rating usually protects against sweat or light splashes under controlled conditions; it does not make earbuds safe for washing like dishes. The removable tips are different because they are separate silicone or rubber parts. Those can usually be washed with warm water and mild soap once removed from the earbuds.
| Earbud Part | Can You Use Water? | Safer Method |
|---|---|---|
| Silicone ear tips | Yes, after removal | Wash with mild soap, rinse, dry fully |
| Earbud rubber tips | Yes, after removal | Wash separately and air dry |
| Speaker mesh | No | Dry brush first, minimal damp swab only if needed |
| Microphone openings | No | Dry brush around openings |
| Charging contacts | No | Dry cotton swab or microfiber cloth |
| Charging case interior | No | Dry brush, dry swab, microfiber cloth |
| Case exterior | Light damp cloth only | Wipe gently, dry immediately |
Safe water-use rule
| Cleaning Situation | Best Action |
|---|---|
| Ear tips are oily or waxy | Remove and wash them separately |
| Earbuds have sweat on shell | Wipe with dry or barely damp cloth |
| Mesh is blocked | Use dry brush, not running water |
| Case has lint inside | Use dry brush or swab |
| Charging pins look dirty | Use a dry swab only |
After washing silicone tips, dry them completely before reattaching. Moisture trapped inside the tip can travel toward the mesh and cause muffled sound or internal damage. A good rule is to let tips air dry longer than you think they need, especially if water remains inside the narrow opening.
Why do my earbuds sound muffled even after cleaning?
Earbuds often sound muffled because wax, dust, oil, or moisture is still blocking the speaker mesh, ear tip opening, or acoustic vents. Sometimes the visible surface looks clean, but debris remains pressed into the grille or stuck inside the ear tip tunnel. This is especially common when users clean too aggressively and accidentally push wax deeper into the mesh instead of lifting it away.
The first thing to check is the ear tips. Remove the silicone ear tips or earbud rubber tips and inspect both the tip opening and the speaker mesh underneath. If the tips are blocked, wash them separately. If the mesh is blocked, hold the earbud with the mesh facing downward and gently brush the surface with a soft dry brush. Do not scrape with pins, needles, knives, or metal tools because they can puncture the mesh or damage the acoustic filter.
| Muffled Sound Cause | What It Looks Like | Cleaning Fix |
|---|---|---|
| Wax over speaker mesh | Yellow/brown film or dots over grille | Dry brush gently with mesh facing down |
| Blocked ear tip opening | Tip tunnel looks narrow or clogged | Remove and wash tip separately |
| Moisture trapped in tip | Sound is dull after washing | Remove tip and let it dry fully |
| Dirty acoustic vent | ANC/transparency sounds weak | Brush around vent lightly |
| One side quieter | One mesh more blocked than the other | Compare both sides and clean gently |
| Driver damage | Cleaning does not improve sound | Consider service or replacement |
Troubleshooting chart
| Problem | Most Likely Cleaning-Related Cause | Next Step |
|---|---|---|
| One earbud is quieter | Wax on one speaker mesh | Clean that side carefully |
| Bass sounds weak | Poor tip seal or oily ear tips | Wash or replace tips |
| Vocals sound dull | Mesh partially covered | Dry brush speaker grille |
| ANC feels weaker | Dirty vents or poor seal | Clean tips and vents |
| Sound got worse after cleaning | Moisture or pushed-in wax | Let dry fully, then brush gently |
If cleaning does not fix muffled sound, the issue may be a damaged mesh filter, failing driver, old battery, software imbalance, or worn ear tips. But in most cases, especially when one earbud is quieter than the other, the first suspect is still wax buildup around the speaker mesh.
What is the safest way to clean earbuds with an earphone cleaning kit?
The safest way to use an earphone cleaning kit is to start with dry tools first, apply very little pressure, and avoid pushing anything into speaker mesh, microphones, or charging ports. Most kits include a soft brush, microfiber cloth, cotton swabs, cleaning putty, an air blower, or a small precision tool. These can be useful, but only if used carefully. The wrong technique can damage earbuds faster than normal dirt.
Begin by turning the earbuds so the speaker mesh faces downward. Use the soft brush to loosen dry wax and dust from the surface. Then wipe the outer shell with a microfiber cloth. If your kit includes cleaning putty, use it lightly on shallow case grooves or exterior surfaces, but do not press it deep into speaker mesh or microphone holes. For charging contacts, use a dry cotton swab rather than a wet one.
| Cleaning Kit Tool | Best Use | Risk if Used Wrong |
|---|---|---|
| Soft brush | Speaker mesh, seams, vents | Can push wax inward if pressed too hard |
| Microfiber cloth | Outer shell and case exterior | Low risk |
| Cotton swab | Case wells, shell edges, contacts | Wet swabs can damage electronics |
| Cleaning putty | Shallow grooves and dust lifting | Can stick in mesh if pushed too hard |
| Air blower | Loose dust and lint | Strong pressure can force debris deeper |
| Precision pick | Case edges only | Can puncture mesh or scratch earbuds |
Best kit-use order
| Step | Tool | Purpose |
|---|---|---|
| 1 | Dry brush | Remove loose debris |
| 2 | Microfiber cloth | Wipe oil and fingerprints |
| 3 | Dry swab | Clean charging contacts and case wells |
| 4 | Washed tips | Clean removable silicone parts separately |
| 5 | Air dry | Prevent moisture before charging |
An earbuds cleaning kit is helpful when it gives you soft, precise tools. It is risky when it encourages over-cleaning. The goal is not to dig into every opening. The goal is to lift debris away from delicate surfaces while keeping moisture out of the electronics.
Should I replace earbud rubber tips or clean them?
You should clean earbud rubber tips regularly, but replace them when they become stretched, cracked, sticky, discolored, loose, or uncomfortable. Ear tips are not permanent parts. They wear down because they touch skin oils, earwax, sweat, heat, and repeated friction. Even with careful cleaning, silicone and rubber can lose grip over time.
Cleaning is enough when the tips are simply oily, waxy, or dusty. Remove them from the earbuds, wash with warm water and mild soap, rinse thoroughly, and dry completely before reattaching. Replacement is better when the material no longer returns to shape, the tip slips off the nozzle, the seal feels weak, or the bass and ANC performance have dropped even after cleaning.
| Ear Tip Condition | Clean or Replace? | Why |
|---|---|---|
| Light wax buildup | Clean | Normal weekly maintenance |
| Sweat residue | Clean | Wash and dry fully |
| Sticky surface after washing | Replace | Material may be degrading |
| Cracks or tears | Replace | Poor seal and hygiene risk |
| Loose fit on earbud nozzle | Replace | Tip may fall off or leak sound |
| Weak bass after cleaning | Replace or resize | Seal may be poor |
| Ear discomfort | Replace or try different size | Fit may be wrong |
Ear tip decision chart
| Symptom | Likely Issue | Best Action |
|---|---|---|
| Earbuds slip out | Oily or worn tips | Clean first, replace if still loose |
| ANC feels weaker | Poor seal | Clean tips or try a larger size |
| Bass is thin | Leaky fit | Replace tips or change size |
| Tips smell bad | Sweat and residue | Deep clean or replace |
| Tips look cloudy/yellowed | Aging material | Replace |
| Tips feel hard | Silicone wear | Replace |
Clean tips improve hygiene, comfort, passive isolation, bass response, and noise cancellation. Replacing tips is one of the cheapest ways to make older earbuds feel better without buying a new pair.
People Also Ask
How do you clean earbuds without pushing wax deeper into the mesh?
To clean earbuds without pushing wax deeper into the mesh, always start with the earbud grille facing downward. This lets loosened debris fall away from the earbud instead of moving into the speaker opening. Use a soft, dry brush and light strokes across the surface. Do not poke straight into the mesh. Do not use pins, needles, toothpicks, or hard metal tools.
If wax is soft or sticky, let it dry slightly before brushing. Wet wax can smear across the mesh and become harder to remove. If dry brushing is not enough, use a cotton swab that is barely damp with 70% isopropyl alcohol and wipe around the mesh edge, not directly into the grille. The swab should never drip.
| Safe Mesh Cleaning Rule | Why It Works |
|---|---|
| Face mesh downward | Debris falls away instead of inward |
| Brush lightly | Protects acoustic filter |
| Use dry tools first | Reduces moisture risk |
| Avoid sharp objects | Prevents punctures and permanent damage |
| Do not press putty into mesh | Prevents material from getting stuck |
| Let earbuds dry before use | Avoids moisture-related muffling |
Mesh cleaning risk chart
| Method | Safety Level | Notes |
|---|---|---|
| Soft dry brush | High | Best first step |
| Microfiber cloth | High | Good for outer shell |
| Barely damp swab | Medium | Use only with control |
| Cleaning putty on mesh | Low | Can get stuck if pressed |
| Needle or pin | Very low | Can damage mesh |
| Running water | Very low | Can damage electronics |
Gentle repeated cleaning is safer than one aggressive cleaning attempt. If the mesh remains blocked, the earbud may need professional service or replacement filters, depending on the model.
Can cleaning earbuds improve noise cancellation and call quality?
Yes, cleaning earbuds can improve noise cancellation and call quality if dirt, wax, sweat, or lint is blocking the ear tips, microphones, speaker mesh, or ANC vents. Noise cancelling earbuds use tiny external and internal microphones to read environmental sound. If those openings are dirty, ANC may become weaker, transparency mode may sound less natural, and calls may become muffled or distant.
Call quality can suffer when microphone holes collect oil, dust, or pocket lint. Even a small blockage can make your voice sound less clear. Cleaning around the microphone openings with a soft dry brush may help restore pickup quality. Do not insert anything into the microphone hole; just clean around it.
Ear tips also matter. A dirty or worn ear tip can weaken the seal in your ear, reducing passive isolation and forcing ANC to work harder. Clean or replacement earbud rubber tips can improve both sound and noise control.
| Feature Problem | Cleaning Area to Check | Why |
|---|---|---|
| Weak ANC | Ear tips, vents, microphones | ANC needs clean sound paths |
| Poor transparency mode | External microphones | Dirt can affect ambient sound pickup |
| Muffled calls | Microphone openings | Voice pickup may be blocked |
| Thin bass | Ear tips | Weak seal reduces low-end response |
| One-sided imbalance | Speaker mesh | One side may be blocked |
| Wind noise issues | Mic/vent area | Debris can disrupt airflow |
ANC and call cleaning priority
| Area | Priority |
|---|---|
| Ear tips | Very high |
| Microphone openings | Very high |
| Speaker mesh | High |
| ANC vents | High |
| Charging case | Medium |
| Outer shell | Medium |
For premium ANC earbuds, cleaning is not only about hygiene. It is part of keeping the sensors and microphones working as intended.
What should you avoid when cleaning earbuds at home?
When cleaning earbuds at home, avoid soaking them, using too much liquid, scraping the mesh, spraying cleaner directly, using sharp tools, or charging them before they are fully dry. Many earbuds are damaged not by dirt, but by unsafe cleaning habits. The smaller and more advanced the earbuds are, the easier it is to damage microphones, mesh, sensors, charging pins, or internal electronics.
You should also avoid using harsh chemicals such as bleach, hydrogen peroxide, strong household cleaners, or scented soaps on the earbud body. These can damage finishes, weaken rubber, irritate skin, or leave residue near the ear canal. Mild soap is appropriate only for removable silicone tips, not the electronic parts.
| Avoid This | Why It Is Risky | Safer Alternative |
|---|---|---|
| Running water over earbuds | Moisture can enter electronics | Wash only removable tips |
| Sharp tools | Can puncture mesh | Use a soft brush |
| Too much alcohol | Can seep into openings | Use barely damp swab |
| Charging while damp | Can damage contacts or case | Air dry fully |
| Bleach or harsh cleaners | Can damage materials | Mild soap for tips only |
| Pressing into mesh | Pushes wax deeper | Brush with mesh facing down |
Do-not-use chart
| Cleaning Item | Use on Earbuds? | Better Choice |
|---|---|---|
| Needle/pin | No | Soft brush |
| Toothpick | No | Cleaning brush |
| Running water | No | Damp cloth for exterior only |
| Bleach | No | Mild soap for tips |
| Wet cotton swab in case | No | Dry swab |
| Compressed air at high pressure | No | Gentle air blower |
The safest home method is controlled cleaning: dry brush first, wash removable parts separately, keep electronics dry, and allow everything to dry before use.
Why does one earbud get dirty faster than the other?
One earbud may get dirty faster because your ears do not produce wax equally, your ear canals may have different shapes, one earbud may seal more tightly, or you may handle one side more often. This is normal. Many users notice that the left or right earbud becomes quieter or waxier first because the fit and wax exposure are not identical on both sides.
Another reason is storage behavior. If one earbud does not sit cleanly in the case, lint or residue may transfer onto it more often. If you frequently remove one earbud for conversations, that side may collect more fingerprints, oil, and pocket dust. For workouts, sweat patterns can also differ depending on how you move, wear hats, or position the earbuds.
| Reason One Earbud Gets Dirtier | What Happens |
|---|---|
| Different wax production | One mesh blocks faster |
| Different ear canal shape | One tip seals deeper |
| More handling on one side | More oil and fingerprints |
| Case debris on one side | One charging well transfers dirt |
| Uneven sweat exposure | One tip becomes stickier |
| Poor fit on one side | More movement and residue buildup |
Left/right imbalance checklist
| Symptom | Check First |
|---|---|
| One side quieter | Speaker mesh on quieter side |
| One side slips out | Ear tip size and oil buildup |
| One side charges poorly | Charging contacts and case well |
| One side smells worse | Ear tip and case pocket |
| One side has weak ANC | Tip seal and mic openings |
Clean both sides, but inspect the dirtier side more carefully. You may also need different ear tip sizes for each ear. Many people assume both ears need the same size, but using different tip sizes can improve seal, comfort, and sound balance.
Is an earbuds cleaning kit better than using household items?
An earbuds cleaning kit can be better than household items if it includes soft, earbud-safe tools and helps you clean precisely. A good kit usually includes a soft brush, microfiber cloth, dry swabs, small air blower, and sometimes cleaning putty. These tools are designed for small grooves, speaker mesh surfaces, charging wells, and case edges.
However, a cleaning kit is not automatically safer. It depends on how you use it. A soft household toothbrush may be safer than a sharp tool from a cheap kit. A microfiber cloth is safer than a rough towel. A dry cotton swab is safer than a wet one inside the charging case. The best cleaning approach combines the right tool with the right pressure.
| Cleaning Option | Best For | Limitation |
|---|---|---|
| Earbuds cleaning kit | Mesh, case grooves, contacts, fine details | Must be used gently |
| Microfiber cloth | Outer shell and case | Cannot remove deep debris |
| Soft toothbrush | Dry mesh brushing | Must be clean and gentle |
| Cotton swab | Case wells and contacts | Too much liquid is risky |
| Mild soap and water | Silicone ear tips only | Not for electronics |
| Cleaning putty | Shallow dust lifting | Risky if pushed into mesh |
Kit vs household comparison
| Need | Better Choice |
|---|---|
| Cleaning speaker mesh | Soft kit brush or soft toothbrush |
| Washing ear tips | Mild soap and water |
| Cleaning case contacts | Dry cotton swab |
| Removing fingerprints | Microfiber cloth |
| Cleaning deep case grooves | Kit brush |
| Heavy wax blockage | Gentle repeated cleaning, not force |
A kit is worth it if you clean earbuds often, own premium earbuds, use them at the gym, or have charging case buildup. But the most important rule remains the same: clean gently, avoid excess moisture, and never force tools into delicate openings.
Editorial Insights
Cleaning earbuds should be treated as routine maintenance, not an occasional cosmetic step. Earbuds sit close to the ear canal, collect wax and moisture, and rely on tiny speaker mesh, microphone openings, sensors, and charging contacts to perform properly. When those areas stay clean, earbuds are more likely to sound clear, fit securely, charge consistently, and feel hygienic during daily use.
The important balance is caution. Proper cleaning can restore muffled audio, improve bass and treble balance, reduce odor, protect earbud rubber tips, and extend the lifespan of the device. Poor cleaning can do the opposite. Too much liquid, sharp tools, aggressive scraping, or pressure on the mesh can damage acoustic filters, block microphones, weaken charging contacts, or push wax deeper into the earbud.
The best approach is simple: clean lightly, clean regularly, and clean each part differently. Wash removable silicone tips separately, brush the speaker mesh gently, keep moisture away from the case and charging pins, and let every part dry completely before use. Precision matters because earbuds are small electronics, not washable accessories.
In short, clean earbuds perform better and last longer—but only when the cleaning method is controlled, gentle, and appropriate for the part being cleaned.